When it comes to personalizing your bathroom, every detail counts, right down to the shower curtain hooks. Customized hooks can add a surprising touch of style and creativity to a bathroom and they’re an easy, fun way to inject some of your own personality into the space. If you’re a DIY enthusiast or just someone interested in sprucing up your bathroom decor, you’ve come to the right place.
In this article, we’ll explore some unique DIY shower curtain hook ideas, each of which can be easily crafted at home, offering an affordable way to create a customized, eye-catching look. From Sculpey clay hooks to vintage spoons, seashells, and more, these DIY projects offer options for everyone, regardless of your crafting skill level.
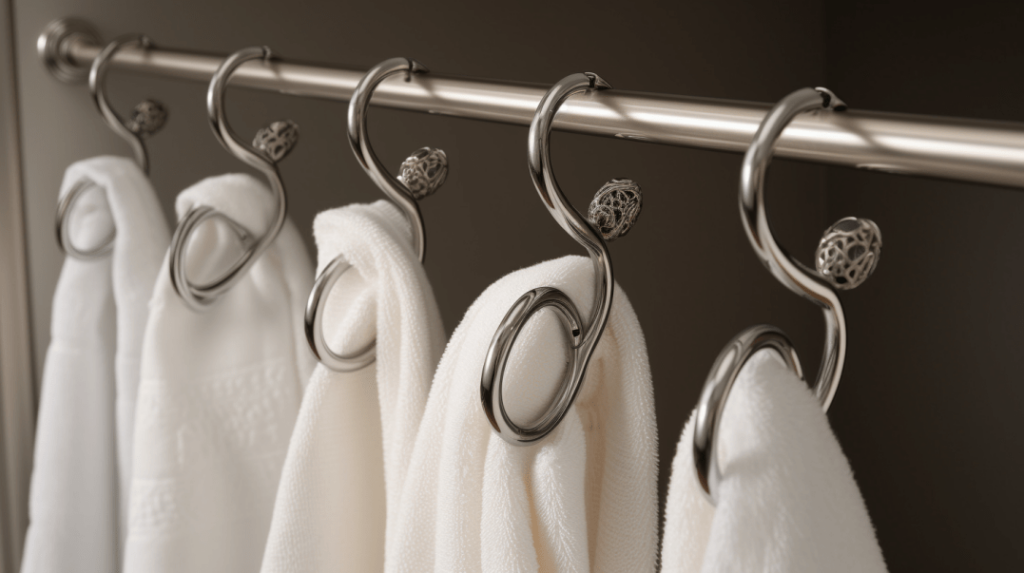
Sculpey Clay Hooks
The first idea we’ll explore is creating Clay Hooks. It’s a relatively easy project, perfect for beginners and those who love hands-on crafts. By using oven-bake clay, you can mold your hooks into any shape or design that fits your bathroom aesthetic.
Materials Needed:
- Sculpey clay (or any other brand of oven-bake clay)
- Metal or plastic rings (make sure these fit your shower rod)
- Oven
- Baking sheet
- Aluminum foil
- Craft glue or superglue
- Clay carving tools or a toothpick
Steps:
- Design your Hooks: Start by deciding what shape or design you want for your hooks. It could be anything from simple geometric shapes to miniature sculptures. Just remember that they need to be functional and durable enough to hold up a shower curtain.
- Sculpt the Clay: Take a small amount of clay and roll it in your hands until it’s soft and pliable. Then begin to shape it into the design you’ve chosen. If you’re making a shape with fine details, you can use carving tools or a toothpick to help.
- Attach the Ring: Before you bake your clay, you need to attach the ring to it. Press the ring into the clay, making sure it’s securely embedded but not so deep that it touches the other side. Ensure that the ring is positioned in such a way that your design will hang correctly when on the shower rod.
- Bake the Clay: Preheat your oven according to the instructions on your clay’s packaging. Place your hooks onto a baking sheet lined with aluminum foil and then bake them for the recommended amount of time. They should be hard and not squishy when you take them out.
- Cool Down: Allow the clay hooks to fully cool down after removing them from the oven. They’ll harden further as they cool.
- Securing the Ring: Once the hooks have completely cooled, check the rings. If they feel loose, use a small amount of craft glue or superglue to secure them in place. Allow any glue to dry thoroughly.
- Final Touches: If you like, you can add paint or varnish at this stage to decorate your hooks further and add an additional layer of protection. Let any paint or varnish dry fully before hanging.
- Hang Your Curtain: Now you’re ready to hang your shower curtain with your new DIY clay hooks. The ring goes over the rod and the clay part should freely dangle to hold the curtain.
Remember that Sculpey and other oven-bake clays are not waterproof, so these hooks should be used in a bathroom where the shower has a liner to protect them from direct water contact. If your shower doesn’t have a liner, consider sealing your hooks with a waterproof sealant.
Wooden Beads
Transforming everyday materials into functional decor items is an essential part of DIY, and this next project perfectly embodies that spirit. For those who appreciate natural textures and elements, wooden bead shower curtain hooks can bring a touch of rustic charm and sophistication to your bathroom. This project is straightforward, requires minimal tools, and offers ample room for customization. Whether you prefer a clean, minimalist look, or you’d like to incorporate intricate designs and bright colors, wooden beads provide a versatile canvas for your creativity.
Materials Needed:
- Large, durable wooden beads with a hole in the middle
- Wire or strong cord
- Wood sealant (optional, but recommended for moisture protection)
- Pliers or wire cutters
- Paint or markers for decoration (optional)
Steps:
- Prepare the Beads: If you’re planning to decorate your beads, do this first. You can paint them or use permanent markers to create your desired design. Let them dry thoroughly before moving on to the next step.
- String the Beads: Cut a length of wire or cord for each bead. The length will depend on how far down you want your shower curtain to hang, but a good rule of thumb is about 2-3 inches. Thread the wire or cord through the hole in the bead.
- Create the Hook: At the top of each wire or cord, make a loop. This will hang on your shower rod. Ensure that the loop is secure. If you’re using wire, you can twist it around itself a few times. If you’re using cord, tie a strong knot.
- Secure the Bead: To ensure that the bead doesn’t move around on the wire or cord, secure it at the bottom. If you’re using wire, bend it into a small loop or twist it a few times. If you’re using cord, tie another strong knot.
- Seal the Wood: If you haven’t done so already, apply a wood sealant to your beads. This will protect them from the moisture in the bathroom and extend their lifespan. Make sure the sealant you use is non-toxic and safe for use in a bathroom.
- Hang Your Curtain: Once your beads are dry, they’re ready to be used. Simply hang the loops over your shower rod and attach your shower curtain to the hooks.
This DIY project allows you to add a touch of natural elegance to your bathroom, with the unique shapes and textures of wooden beads. The customization options are endless: paint them in a single color for a minimalist look, or create intricate designs for a more eclectic feel. No matter what your bathroom’s decor theme is, these wooden bead hooks can fit right in.
Knotted Rope
For those who favor a maritime or rustic aesthetic, or simply appreciate the beauty of functional craftsmanship, creating shower curtain hooks out of knotted rope can be an excellent project. This DIY task not only enables you to add a nautical touch to your bathroom, but it also offers an introduction to the art of knot-tying. With just a few basic materials and a little patience, you can create stylish and sturdy shower curtain hooks that are sure to become a talking point.
Materials Needed:
- Nylon rope or paracord – choose a thickness that suits your design, but ensure it’s sturdy enough to hold the weight of a shower curtain.
- Scissors
- Lighter (for sealing the ends of the nylon rope)
- Measuring tape
Steps:
- Measure and Cut: Decide how long you want your hooks to be. Remember, you’ll be creating a loop that goes over the shower rod and has enough length to hold the curtain. A good starting point might be around 6-8 inches, but this can vary based on your preference. Cut as many pieces of rope as you need hooks.
- Knotting: Now it’s time to create the knot that will serve as your “hook”. A simple overhand knot or figure-eight knot can work well. Position the knot about two-thirds of the way down the rope – this will create a longer “hook” section to hold the curtain and a shorter “loop” section to go over the rod.
- Seal the Ends: If you’re using nylon rope or paracord, it can fray at the ends. To prevent this, carefully use a lighter to melt the ends of the rope, which seals them. This step should be done by an adult and in a well-ventilated area.
- Testing: Before you hang your curtain, test one of your rope hooks to make sure it fits over the rod and can hold the weight of the curtain. If all is well, you’re ready to hang the rest.
- Hang Your Curtain: Loop the shorter end of your knotted rope over the shower rod and attach the curtain to the longer end. Adjust as necessary until you’re happy with the placement.
With their rugged appeal and handmade charm, these knotted rope shower curtain hooks can add a unique touch to your bathroom decor. Plus, they’re proof that simplicity can indeed result in stunning design elements. Enjoy your crafting!
Vintage Spoons
If you’re a lover of all things vintage or just looking for a unique way to add character to your bathroom, why not consider vintage spoons as shower curtain hooks? The charm of old spoons not only offers an aesthetic appeal, but they also provide a practical, sturdy solution for holding your shower curtain. This is a wonderful way to upcycle items and adds a fascinating twist to your bathroom decor.
Materials Needed:
- Vintage spoons – one for each hook you’ll need
- Pliers
- Protective gloves
- Metal file (optional)
Steps:
- Finding Your Spoons: The first step is to find your vintage spoons. Flea markets, garage sales, or thrift stores often have an assortment of mismatched silverware that you can choose from. Spoons with interesting designs or patinas can add extra character to your hooks.
- Preparing for the Bend: Before you begin bending your spoons, it’s a good idea to put on protective gloves. This will help protect your hands from any sharp edges.
- Bending Your Spoons: Using your pliers, firmly grasp the spoon near the bowl. Slowly apply pressure to bend the handle of the spoon upwards, creating a hook shape. The bowl of the spoon will be the part that holds your shower curtain, and the handle will go over the shower rod.
- Smoothing the Edges: If you notice any sharp edges after bending, use a metal file to smooth them down.
- Hanging Your Curtain: Once your spoon is bent into a hook shape, simply hang it over the shower rod, with the bowl facing outwards to hold the shower curtain.
This vintage spoon project offers an eclectic, retro vibe to your bathroom and is a wonderful conversation starter. The authenticity and uniqueness of each piece add a charming and personalized touch to your home decor.
Plastic Toys
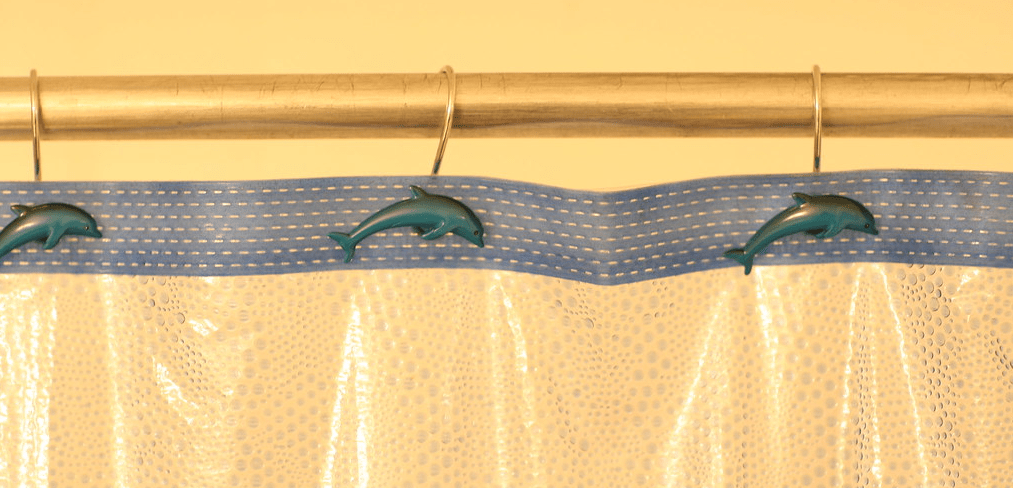
Adding a sense of whimsy and fun to your bathroom can make it a more inviting space, and what better way to do that than with plastic toy shower curtain hooks? Perfect for a child’s bathroom or just the young at heart, this DIY project transforms small plastic toys into delightful and unexpected decor. You can select toys that align with a theme, like dinosaurs, sea creatures, or even favorite cartoon characters. Ready for a bit of fun?
Materials Needed:
- Small plastic toys
- Drill with a small bit
- Durable string or thin rope
- Scissors
Steps:
- Selecting Your Toys: First, choose the plastic toys you’ll use. Keep in mind they should be small enough to fit comfortably as a curtain hook and not too heavy.
- Drilling the Hole: Carefully drill a hole through the top part of each toy. The hole should be large enough to thread your string or rope through but small enough to not damage or split the toy.
- Stringing the Toys: Cut pieces of string or rope, each long enough to create a loop over your shower rod. Thread one piece of string through the hole in each toy.
- Creating the Loop: Tie a strong knot at the top of each string to create a loop. This loop will hang over the shower rod. Ensure the loop is large enough to fit over the rod but small enough to stay securely in place.
- Securing the Toy: Tie another knot at the bottom of the toy to secure it on the string. This will make sure the toy hangs down correctly to hold the curtain.
- Hanging Your Curtain: Now hang the loops over the shower rod, with the toys facing outwards to hold the shower curtain.
These playful shower curtain hooks can add a pop of color, fun, and imagination to any bathroom. It’s a creative way to repurpose old toys and can certainly bring a smile to your face each time you see them.
Wine Corks
For wine lovers and recycling enthusiasts alike, this next DIY project is a perfect blend of creativity and sustainability. By using leftover wine corks, you can create functional and stylish shower curtain hooks that will add a unique, earthy aesthetic to your bathroom. This innovative way to repurpose wine corks also contributes to eco-friendly living.
Materials Needed:
- Wine corks – one for each hook you’ll need
- Durable string or thin rope
- Drill with a small bit
- Scissors
Steps:
- Preparing the Corks: The first step is to gather your wine corks. Ensure they are clean and dry before starting the project.
- Drilling the Hole: Using a drill with a small bit, carefully drill a hole through the top of each cork. The hole needs to be large enough to fit the string or rope you’re using, but not so large that the cork splits or crumbles.
- Stringing the Corks: Cut lengths of string or rope, each about 6-8 inches long (or longer if you prefer). Thread one length of string or rope through the hole in each cork.
- Creating the Loop: Tie a strong knot at the top of each string or rope to create a loop. This loop will hang over your shower rod. Make sure the loop is large enough to fit over the rod but small enough to stay in place.
- Securing the Cork: Tie a knot at the bottom of the cork to secure it on the string or rope. This will ensure the cork stays in the center of the string.
- Hanging Your Curtain: Hang the loops over the shower rod, and attach your shower curtain to the hooks. The cork should face outwards to hold the shower curtain.
These wine cork shower curtain hooks offer a fun and whimsical touch to any bathroom, and they’re an excellent way to reuse materials you might otherwise discard.
Acrylic Gemstones
If you’re after a bit of glitz and glam in your bathroom decor, creating shower curtain hooks from acrylic gemstones could be the DIY project for you. Adding these sparkling gems not only infuses a touch of luxury and opulence into your bathroom but also captures and reflects light, creating a visually stunning effect. This project is simple, quick, and the end result is undeniably charming. Here’s how you can create your own dazzling acrylic gemstone shower curtain hooks.
Materials Needed:
- Acrylic gemstones (preferably with pre-drilled holes)
- Durable wire
- Wire cutters
- Pliers
Steps:
- Preparing Your Gemstones: Select your acrylic gemstones. These can be found in a variety of colors and sizes, allowing you to match them to your bathroom decor. Opt for ones with pre-drilled holes to make the process easier.
- Cutting the Wire: Measure and cut your wire. Each piece should be long enough to create a loop for the shower rod and a hook for the curtain, plus a little extra for securing the wire. A good starting point might be about 4-6 inches.
- Thread the Gemstone: Slide the gemstone onto the wire, positioning it around the center.
- Form the Hook and Loop: Using your pliers, bend one end of the wire to form a hook for the shower curtain. On the other end, create a loop that will hang over the shower rod.
- Securing the Gemstone: Once your wire is shaped, use the pliers to pinch the wire just above and below the gemstone. This will keep the gemstone securely in place on the hook.
- Hanging Your Curtain: Hang your newly crafted gemstone hooks onto the shower rod, and attach your shower curtain to the hooks.
This DIY project allows you to infuse a sense of glamour and style into your bathroom. With an array of colors to choose from, these acrylic gemstone hooks can easily match any color scheme or theme.

Colby Armstrong
Colby Armstrong, born and raised in Vermont, is an inventive designer who developed a fascination for interior design and color coordination from a young age, influenced by his home decorator parents. An ardent hiker and nature enthusiast, Armstrong draws inspiration from natural elements and colors, incorporating them into his unique shower curtain designs.